How to lay out a bathroom around the clearances code requires
Learn how to create a successful bathroom design by mapping out the required clearances for your toilet, shower and sink to pass local building codes.
 Prepared by Fiona Eckhart
- 8 min. to read
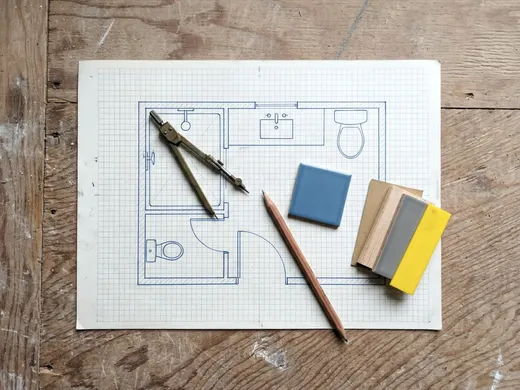
A successful bathroom design relies on the empty space around your fixtures. Code requires specific clearances for toilets, showers and sinks so people can move safely. You save time and money by mapping out these measurements before you move any pipes.
Locate the wall that holds the plumbing
The layout process begins with the large drain pipes. Your house has a main drain stack that carries wastewater away. The wall framing that holds these main pipes is the wet wall.
Toilets require large drains. These large pipes need space inside the floor joists. Moving a toilet drain across the room is difficult because the work requires cutting into the floor structure. This drives up plumbing costs quickly.
The wet wall also holds the vent pipes. Drains need venting, usually through a pipe that runs up through the roof. These vents allow air into the system so the water drains smoothly. If you move the toilet away from the wet wall, the plumber has to install new vent lines inside the walls.
Keeping the toilet and shower near the existing wet wall saves money. You can route water supply lines easily. The drain lines reach the main stack with the correct slope.
The wet wall is usually built with thicker lumber to hide a wide drain stack. Sinks use smaller pipes. You have more freedom to move a vanity to a different wall. The toilet and the shower demand priority.
Measure toilet clearances to the side and front
Toilets need clear floor space so people can sit comfortably. You measure this space in two directions. The first measurement goes from the center of the toilet drain to the side walls. The second measurement covers the open area directly in front of the bowl.
Rules change depending on your state and county. Adams County, Colorado's guide is written for the 2024 IRC. Its November 18, 2025 basement finish guide requires at least 21 inches of clear space in front of a toilet and 15 inches from its center to any sidewall.
California properties follow different rules. A Glendora handout under the 2025 California Plumbing Code requires at least 24 inches of clear space in front of a toilet, lavatory or bidet. Toilets must sit at least 15 inches from center to a side wall and 30 inches center to center from a similar fixture.
If you place a bidet next to a toilet, you measure from the middle of the toilet drain to the middle of the bidet drain. A vanity cabinet or a bathtub also counts as a boundary. The side clearance applies from the center of the toilet to the edge of a glass shower wall.
Draw a line straight down the middle of the toilet bowl. Measure outward from that line. You measure the front clearance from the leading edge of the toilet bowl. An elongated bowl sticks out further into the room and eats into your required front clearance.
Plan the shower size and door opening
Showers must meet minimum size rules to prevent slipping hazards. The building code dictates the total floor area. It also requires a specific shape so a person can turn around.
The code measures the floor area in square inches. It uses a standard circle to test the shape. The flat floor of the shower must hold that invisible circle.
The Adams County guide requires showers to have at least 900 square inches of inside area. The shower floor must also fit a 30-inch circle. The Glendora handout requires a shower of at least 1,024 square inches. This larger shower must still fit a 30-inch circle.
A long rectangle might hold enough total square inches. If the rectangle is too narrow, the standard circle overlaps the boundaries. The shape must accommodate human shoulders. Both the area and the circle tests apply.
You also have to plan the shower entrance. A glass shower door usually swings outward. You cannot put a toilet directly in front of the shower door. The swinging glass will hit the porcelain bowl.
Control the door swing and locate the vanity
The main room door sweeps across the floor when it opens. You have to keep this path clear.
The room door cannot swing into the required empty space in front of the toilet. It cannot hit the vanity drawers. If the door blocks someone standing at the sink, the layout fails.
Sink clearances dictate where the vanity goes. The Glendora rules require 24 inches of clear space in front of a lavatory. You stand in this spot to use the faucet. The room door should not hit your back.
The depth of the vanity cabinet changes your floor plan. A standard vanity is deeper than a wall-mounted sink. If you install a deep cabinet in a narrow room, you might lose the required clear space in front of it. Measure from the front edge of the countertop to the opposite wall.
If the room is tight, change the room door. You can rehang the door to swing out into the hallway. You can also frame the wall for a pocket door. A pocket door slides inside the wall framing and frees up floor space.
Check the ceiling height over the shower
Floor space is only one part of the code. Bathrooms require a minimum ceiling height over the fixtures.
Showers need enough ceiling height for headroom. A bathroom with a flat, tall ceiling easily passes this rule. Sloped roofs in an attic cut into the available headroom.
Basements present ceiling challenges. Heating ducts and plumbing lines hang down from the floor joists above. A low basement ceiling can dictate exactly where the shower goes.
The building code sets a specific minimum height for the area over the shower pan. You measure this from the finished floor of the shower straight up to the finished ceiling. Check your local rules before framing the walls.
The shower pan itself raises the floor height. A custom mud pan for a tile shower lifts the floor higher than a flat sheet of vinyl. This raised floor subtracts from your total ceiling clearance. You account for the thickness of the shower pan when you calculate the headroom.
Draw the room to scale and check each clearance
Test your layout ideas on paper before you begin demolition. Buy a pad of grid paper and a pencil. Assign a scale where one square equals a specific number of inches.
Follow these steps to check your layout:
- Measure the exact length and width of the bare room.
- Draw the perimeter walls, the window and the doorway on the grid.
- Cut out paper shapes for the toilet, the shower and the sink to the same scale.
- Place the toilet cutout over the main drain line on your drawing.
- Count the grid squares from the center of the toilet to the wall to verify the side clearance.
- Draw the required clear space in front of the toilet bowl and the sink.
- Draw an arc to show the path of the main door swing.
Clearances are measured from finished surfaces. Bare wood studs are only the beginning. Drywall adds thickness to the walls. Cement board and tile add more thickness.
If you measure your toilet side clearance from a bare stud, you could fail the final inspection. The finished tile wall pushes into that required empty space. Factor wall materials into your scaled drawing. A layout that works on paper gives you a firm base for weighing bathroom remodel ideas.
You catch mistakes on paper before you pay a plumber to drill holes. Drawing the clearances helps you confirm your fixtures fit.
Compare local codes side by side
Bathroom measurements vary by place, as a Colorado county and a California city show.
Front clearance and shower area differ between the two places, while side clearance and the circle test match.
Clearance rule | Adams County, Colorado (2024 IRC) | Glendora, California (2025 California Plumbing Code) |
|---|---|---|
Toilet side clearance | 15 inches from center to sidewall | 15 inches from center to side wall |
Toilet front clearance | 21 inches of clear space | 24 inches of clear space |
Shower inside area | 900 square inches | 1,024 square inches |
Shower circle test | Fits a 30-inch circle | Fits a 30-inch circle |
If you lay out a bathroom in California using the Colorado rules, the layout might not pass inspection, and the building department can require changes.
Confirm the rules with your building department
States adopt different editions of the building codes. A state might use an older version of the residential code for several years. Counties and cities then add local amendments. They write extra rules that apply only within their borders.
You must ask your local building department for their exact rules. Call their office. Tell them you are mapping out a bathroom renovation. If you plan to hire a contractor, ask the builder which code edition the town uses.
Request any handouts the city provides for residential plumbing. The local inspector has the final say on your layout. Getting their rules in writing helps your renovation pass the rough and final inspections.
Inspectors commonly walk through the room during the rough framing stage. They check the empty floor before the drywall goes up. They look at where the plumber drilled the holes for the drains. If something does not match the approved plans or local rules, the inspector may write a correction notice.
The inspector returns for the final inspection when the room is finished. They look at the installed toilet, the glass shower door and the vanity sink. They check the final clear space to ensure the finished room matches the paper plan.
More for this project
A master bathroom plan that works for two people
Find practical master bathroom remodel ideas to help two people share a layout, covering double vanities, separate toilet rooms and layout clearances.
12 bathroom remodel ideas to decide on before demo day
The best bathroom remodel ideas change what gets built behind the drywall so you can plan all your framing and plumbing changes before demo day.
Planning an ADU from the zoning check to the floor plan
Planning a property addition starts with practical accessory dwelling unit ideas and a zoning check before you move on to a 2-bedroom adu floor plan.