12 bathroom remodel ideas to decide on before demo day
The best bathroom remodel ideas change what gets built behind the drywall so you can plan all your framing and plumbing changes before demo day.
 Prepared by Fiona Eckhart
- 7 min. to read
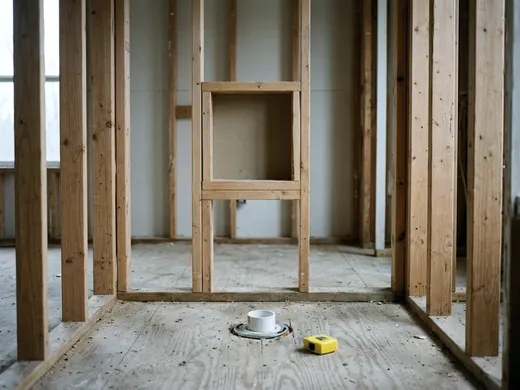
The best bathroom remodel ideas change what gets built behind the drywall. You must settle your structural layout and plumbing plans before demo day so your contractor can price the work accurately. Confirm the exact code edition and local amendments with your own building department before you begin.
1. A curbless shower and its dropped floor
A curbless shower eliminates the step into the bathing area to create an unbroken floor line. This can make the bathroom easier to clean and to enter for people with mobility issues. The shower pan still has to slope down to the drain to shed water properly. Since you cannot build the curb up, your contractor may need to recess the subfloor between the joists, and a licensed pro and your building department should confirm any joist change.
This takes structural framing changes that have to be planned before the crew opens up the floor. If the existing joists cannot be modified safely, you might have to raise the rest of the bathroom floor slightly. Discuss this floor height with your framer during the bid process to understand the costs.
2. A larger shower footprint
Increasing your shower size changes the room layout and moves the drain location. Showers need at least 900 square inches of inside area that fits a 30-inch circle, according to Adams County, Colorado's November 18, 2025 basement finish guide, written for the 2024 IRC, and your own building department sets the rule where you live. Settle your final dimensions early so the plumber can run the drain line exactly to the center.
A larger shower also needs proper access for the people using it. The same Adams County, Colorado guide, written for the 2024 IRC, sets a minimum clear opening of 22 inches for a shower door, so confirm the figure locally. Plan your glass layout and the door swing before framing starts. Check that the open door clears the vanity and the toilet.
3. Moving the bathtub plumbing
Relocating a freestanding or alcove bathtub requires new water supply lines and a different drain location. Moving the drain can mean notching or drilling floor joists, which a licensed pro and your building department should approve first. If the joists run the wrong way, the plumber might drop the pipes into the ceiling below. This adds drywall repair work to a completely different floor of your house.
Tell your contractor exactly where the tub will sit during the initial planning phase. They need to verify if the floor framing can handle the heavy water weight. They also have to check the new pipe routes against the structural beams. Deciding to move the tub late in the project often means a costly change order.
4. Niches framed between studs
Shower niches sit recessed into the wall to hold soap without taking up your elbow room. A built-in niche replaces wire baskets that rust over time and stick out into the shower space. Your carpenter has to frame these boxes between the vertical wall studs long before the waterproof backer board goes up.
Pick your shower wall locations and decide exactly how tall the niches should be early. Measure your tallest shampoo bottles to ensure they will fit on the finished shelf. The crew can then add the horizontal wood blocking on rough-in day. Missing this step means the tile setter has nowhere to build the box later.
5. Blocking for future grab bars
Grab bars need solid backing behind the drywall, since hollow wall anchors alone may not hold a person's weight, so follow the bar maker's instructions and check with your building department. Even if you do not want metal bars right now, ask your framer to install solid wood blocking. They use scrap two-by-fours screwed horizontally between the vertical studs.
Place the wood blocks between the studs in the shower enclosure and near the toilet. Take clear pictures of the exposed framing before the walls close up. Keep a tape measure visible in the photos to show the exact height from the floor. This gives you a reliable map of exactly where to drill years from now.
6. A separate toilet room
Enclosing the toilet in its own small room offers deep privacy for shared spaces. Framing a new closet takes up valuable square feet and changes the traffic flow. The small room may also need its own light and, if it has no window that opens, an exhaust fan under the 2024 IRC as Adams County, Colorado applies it, so ask your own building department.
Review how to lay out a bathroom early to make sure you have enough physical clearance. You need space for the interior walls, the door swing and the required legroom. If the space feels too tight on paper, it will feel even smaller once built.
7. Heated floors and their electrical circuit
Electric radiant floor heating warms the tile from below. The heating mats sit in the thinset mortar right under the tile layer. Many mats need a dedicated circuit from your breaker box, so follow the maker's instructions and your local electrical code.
Your electrician will likely run a new wire from the panel to the wall thermostat location. This rough wiring must happen while the walls are still completely open. If you decide you want warm floors after finishing the drywall, patching the new wire path destroys your fresh paint.
8. A fan that vents to the outside
While many bathroom makeover ideas focus on paint, good ventilation helps protect those finishes from moisture. The 2024 IRC requires a fan in bathrooms with windows that do not open, and your own building department can confirm the local rule. It must vent outside and not end within 3 feet of an opening, according to the Adams County guide, which applies the 2024 IRC in Adams County, Colorado.
Decide where the exhaust fan will sit before the ceiling closes up. The crew has to route the rigid metal ductwork through the ceiling joists. They push it to the roof or an exterior wall. Doing this early ensures the duct run stays short and straight for the best airflow.
9. A wall-hung toilet or vanity
Mounting fixtures to the wall frees up actual floor space and makes mopping very simple. A wall-hung toilet hides its bulky water tank inside the wall cavity. A floating vanity hangs all its cabinet weight and the stone counter on the wood studs. Neither fixture rests any weight on the floor.
Both options need solid support inside the wall, such as the carrier or blocking the maker specifies, to stay attached safely. The carpenter must install these rigid supports inside the framing before the drywall arrives. If you buy a floating vanity at the last minute, standard wall framing may not hold the loaded drawers.
10. Layered lighting at the mirror
A single ceiling light creates harsh dark shadows on your face when you use the mirror. Plan for wall sconces on either side of the glass to provide soft, even lighting.
The electrician must run the rough wiring to those exact wall locations early in the job. You have to choose your mirror size and the exact vanity position before the crew arrives. If the electrical boxes sit too close together, your new mirror will not fit between them.
11. A vanity built with drawers
Standard base cabinets with doors leave you digging in the dark around the messy plumbing trap. Specifying a vanity made almost entirely of deep sliding drawers brings your stored items out to you. Drawers organize the tight space much better than deep open shelves. Small items just get pushed to the back of a shelf and lost.
Check the exact plumbing measurements of the vanity before the rough-in stage begins. Your plumber can then route the wall drain and the supply lines to clear the drawer boxes perfectly. Failing to plan this means the carpenter will have to cut ugly notches out of your brand new drawers.
12. A pocket door to save swing space
A standard swing door opens into the bathroom and eats up valuable floor space. A pocket door solves this by sliding right into the hollow wall cavity. This leaves the room completely clear for permanent fixtures and general walking space.
The carpenter has to install a special metal track frame inside the wall to hold the door. Because the door lives inside the wall, the electrician and plumber usually cannot route wires through that section. Plan this door early so all the trades know which walls are off limits for their rough utilities.
How to balance these ideas with your budget
Adding multiple framing and plumbing changes can push your total project costs higher quickly. The 2023 American Housing Survey put the median spent on a bathroom remodel at $5,000 over 2021 to 2023, according to the US Census Bureau. Big structural shifts and custom tile pans can push a project past that median.
Focus your initial funds on the structural ideas that require open walls and floor joists. You cannot easily add blocking for grab bars or drop the shower floor once the tile sets. You can always upgrade surface fixtures like faucets and mirrors a few years down the line.
Build a strict renovation project budget before you ask contractors to bid. Bring your finalized list of structural changes to the first bid meeting.
More for this project
A master bathroom plan that works for two people
Find practical master bathroom remodel ideas to help two people share a layout, covering double vanities, separate toilet rooms and layout clearances.
How to lay out a bathroom around the clearances code requires
Learn how to create a successful bathroom design by mapping out the required clearances for your toilet, shower and sink to pass local building codes.
Planning an ADU from the zoning check to the floor plan
Planning a property addition starts with practical accessory dwelling unit ideas and a zoning check before you move on to a 2-bedroom adu floor plan.